yt-dlp -o "%(playlist_index)s - %(title)s.%(ext)s" [PLAYLIST_URL]
It may also help to use
yt-dlp --cookies-from-browser firefox -o "%(playlist_index)s - %(title)s.%(ext)s" [PLAYLIST_URL]
yt-dlp -o "%(playlist_index)s - %(title)s.%(ext)s" [PLAYLIST_URL]
It may also help to use
yt-dlp --cookies-from-browser firefox -o "%(playlist_index)s - %(title)s.%(ext)s" [PLAYLIST_URL]
Grab:
7zip – https://www.7-zip.org/download.html
LZMA SDK – https://www.7-zip.org/sdk.html
UniExtract2 – https://github.com/Bioruebe/UniExtract2?tab=readme-ov-file
SNMPTester – https://www.paessler.com/tools/snmptester
MT.exe – https://github.com/jvincke/mt/blob/master/x64/mt.exe
Install 7zip
Extract Paessler SNMP Tester.zip to c:\install\
Extract UniExtract2 to c:\install
Run UniExtractUpdater_NoAdmin.exe and allow it to update
Run UniExtract.exe
Select Next, Next, Finished in the wizard to skip initial setup.
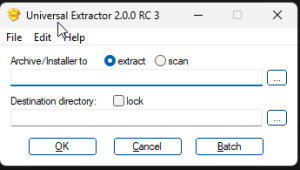
Select Archive/Installer to extract
Select the “c:\install\Paessler SNMP Tester Setup.exe” file
Select the destination directory as “C:\install\Paessler SNMP Tester Setup”
The SNMP Tester files will be extracted to that directory.
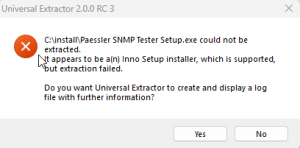
If you receive a message that UniExtract is not compatible with the version of installer, try updating UniExtract.
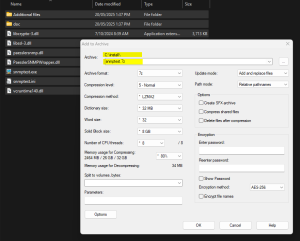
Select all the files in the SNMP Tester Extracted directory, and create a 7z archive in the c:\install directory. Name the file snmptest.7z. Ensure that the snmptest.exe file is the root of the 7z archive, not a subdirectory.
Extract the 7zSD.sfx file from the LZMA SDK \ bin directory to c:\install
Copy the mt.exe file to c:\install
Create c:\install\SNMPTester.manifest containing:
<?xml version="1.0" encoding="utf-8"?>
<assembly xmlns="urn:schemas-microsoft-com:asm.v1" manifestVersion="1.0" xmlns:asmv3="urn:schemas-microsoft-com:asm.v3">
   <compatibility xmlns="urn:schemas-microsoft-com:compatibility.v1">
      <application>
         <!--application support for Windows Vista -->
         <supportedOS Id="{e2011457-1546-43c5-a5fe-008deee3d3f0}"/>
         <!--application support for Windows 7 -->
         <supportedOS Id="{35138b9a-5d96-4fbd-8e2d-a2440225f93a}"/>
      </application>
   </compatibility>
   <trustInfo xmlns="urn:schemas-microsoft-com:asm.v2">
      <security>
         <requestedPrivileges>
            <requestedExecutionLevel level="asInvoker" uiAccess="false"/>
         </requestedPrivileges>
      </security>
   </trustInfo>
</assembly>
Create c:\install\config.txt file containing:
 ;!@Install@!UTF-8!
Title="SNMP Tester"
RunProgram="snmptest.exe"
;!@InstallEnd@!
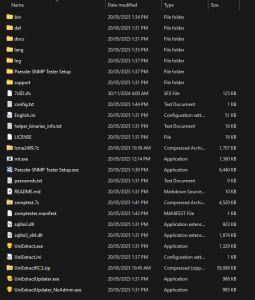
You should have a number of files in c:\install
Open a command prompt, navigate to c:\install and run the following command
mt.exe -manifest "SNMPTester.manifest" -outputresource:"7zSD.sfx;#1"

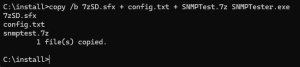
copy /b 7zSD.sfx + config.txt + SNMPTest.7z SNMPTester.exe
That will output a self extracting archive (c:\install\SNMPTester.exe) that runs snmptest.exe and remove the temp files upon completion.
You can move c:\install\SNMPTester.exe to where it is needed and remove all files in c:\install
References:
https://superuser.com/questions/42788/is-it-possible-to-execute-a-file-after-extraction-from-a-7-zip-self-extracting-a
https://superuser.com/questions/730242/7zip-self-extracting-executables-require-admin-privileges-and-trigger-compatib

Add a custom filter
accounts.google.com/gsi/*
I needed to migrate PS scripts from using write-host to write-output but wanted to keep colour
I found this block of code
function Write-ColorOutput($ForegroundColor)
{
# save the current color
$fc = $host.UI.RawUI.ForegroundColor

# set the new color
$host.UI.RawUI.ForegroundColor = $ForegroundColor

# output
if ($args) {
Write-Output $args
}
else {
$input | Write-Output
}

# restore the original color
$host.UI.RawUI.ForegroundColor = $fc
}

# test
Write-ColorOutput red (ls)
Write-ColorOutput green (ls)
ls | Write-ColorOutput yellow
Needed to search CSV file for a specific string, and delete any lines containing that string. Strangely enough I was already looking at the file in VSCode so decided to use that for the replace.
Do a search and replace, select regex, and use the format
^.*($STRING).*\n?
Where wordToSearchFor is the word to remove the entire line of, and use a replace entry of blank. ($STRING can’t contain a pipe character).
eg: ^.*(c:0u.c).*\n
The good thing about VSCode is it allows you to see the results of the query before performing the replace.
The order of processing for the email protection type: This order is not configurable, and is described in the following table:
| Order | Email protection | Category | Where to manage |
|---|---|---|---|
| 1 | Malware | CAT:MALW | Configure anti-malware policies in EOP |
| 2 | Phishing | CAT:PHSH | Configure anti-spam policies in EOP |
| 3 | High confidence spam | CAT:HSPM | Configure anti-spam policies in EOP |
| 4 | Spoofing | CAT:SPOOF | Spoof intelligence insight in EOP |
| 5* | User impersonation (protected users) | UIMP | Configure anti-phishing policies in Microsoft Defender for Office 365 |
| 6* | Domain impersonation (protected domains) | DIMP | Configure anti-phishing policies in Microsoft Defender for Office 365 |
| 7 | Spam | CAT:SPM | Configure anti-spam policies in EOP |
| 8 | Bulk | CAT:BULK | Configure anti-spam policies in EOP |
I couldn’t change the server config, and the ovpn file being used had:
cipher AES-256-GCM
# openvpn --version
OpenVPN 2.6.0 x86_64-pc-linux-gnu [SSL (OpenSSL)] [LZO] [LZ4] [EPOLL] [PKCS11] [MH/PKTINFO] [AEAD] [DCO]
From what I could see at https://github.com/OpenVPN/openvpn-gui/issues/381 I modified the ovpn file and changed the cipher AES-256-GCM line to
data-ciphers AES-256-GCM
After much searching I found the correct path / url combination to allow webdav to work with Nextcloud
net use k: https://cloud.anonit.net/remote.php/webdav /user:%USERNAME% %PASSWORD%
After updating an ancient IBM System x3200 M3 IMM firmware, attempting to logon gave the following error: “Your session has been terminated due to account deletion, account disabled, session termination, or session inactivity.”

This forum post had the answer in a screenshot. You will need the ASU (older version for this model (v9.64) – you can download this from IBM.
Running the downloaded file extracts the ASU utility to the current directory. Once extracted, open a command prompt and run the following commands (substituting %HOSTIP%, %USERID%, %PASSWORD% with your details):
asu64.exe set IMM.https_service enable –host %HOSTIP% –user %USERID% –password %PASSWORD%
asu64 set IMM.SSL_Server_Enable enable –host %HOSTIP% –user %USERID% –password %PASSWORD%
asu64 rebootimm –host %HOSTIP% –user %USERID% –password %PASSWORD%
(The full IMM documentation is here)
You should now be able to access the IMM over HTTPS.
From what I can determine, the firmware update changes something with HTTP and cookies, and HTTPS was not enabled on the original IMM firmware.
I had a scenario where I was using a single name SSL certificate which was setup for mail.domain.test. I needed to get autodiscover to work for this domain name. The DNS host was Godaddy.
I configured an SRV record as follows:

The target pointed to the certificate name. EG: mail.domain.test. This allowed the https://testconnectivity.microsoft.com test to go through.
References:
https://au.godaddy.com/help/outlook-windows-manually-add-autodiscover-srv-record-20066